- Published on
Customize commercetools using Custom Fields
- Authors

- Name
- John Duane
- @johnpduane
Introduction
commercetools is a dynamically extensible, cloud-native commerce solution. It allows retailers to sculpt a solution that fits their unique needs today, and is flexible to support their evolving business strategy tomorrow.
There are many powerful extensibility features built into commercetools that handle a wide variety of use cases. For an overview of them, see Customization Options for the commercetools Platform.
In this post we will do a deep dive on one powerful technique for customizing commercetools: Custom Fields.
What are Custom Fields?
Custom Fields allow you to add data to an existing commercetools resource.
commercetools Composable Commerce APIs provide flexible data models that cover a wide range of use cases with the standard fields on the resources and their data objects. However, you might want to add additional fields to resources and data types to better support your usage scenario.
– Custom Fields, Composable Commerce Documentation, commercetools
For example, it's pretty common for retailers to want to customize the attributes they maintain about their customers. If the retailer has not integrated a customer experience (CX) platform or similar solution, commercetools offers Custom Fields as a powerful way to expand customer attributes to suit specific needs.
The list of commercetools resources that can be extended with Custom Fields is broad. It’s possible to augment the data model for Categories, Customers, Carts, Orders, Line Items, Shopping Lists, Reviews, and many more. See the complete list at Customizable Resources.
Let’s drill down on a sample use case to see how to benefit from this capability.
Implementation Example
One of the commercetools resources you can extend is LineItem. In this example, we will add a Custom Field to our LineItem so we can provide our downstream data analytics platform with more information about how the customer’s cart was crafted.
We will use a fictional use case that does not have much validity in the real world, that we hope is fun and allows us to focus more on how to enhance commercetools over use case plausibility.
Use Case
A retailer wishes to know the touch point where the customer added a line item to their cart to differentiate, for instance, whether the add to bag action took place on a product detail page, from a quick view modal, or from other user interfaces. This information is to be stored with all carts for easy access by the retailer’s data analytics platform.
Problem
There is no field within a cart’s LineItem array to describe the source of the addition.
Solution
Create a Custom Field on the LineItem resource which can store a string indicating the source of the add to cart action that created the line item.
Implementation Steps
Our example implementation is thorough! We will show you how to:
- Create a commercetools project,
- Load sample data,
- Create a new Type for the LineItem Custom Field,
- Use the HTTP API to create a cart,
- Use the HTTP API to update a cart using the Custom Field,
- Use the HTTP API and IMPEX to query carts for data in the Custom Field,
- Stand up a Front End Single Page Application (SPA) to connect to our project,
- Extend the SPA to update our Custom Field on add to bag actions using GraphQL,
- Write queries to find all line items added from various touch points in the SPA,
- Provide you with resources if you need help.
Step 1: Create a commercetools project.
If you already have a commercetools project you can skip this step. If not, there is good news: you can easily sign up for a risk-free, fully-functional 60 day commercetools trial. The trial period does introduce a few limits, like the total number of products you can define, but the feature set is rich as we will see in this paper.
Go to https://commercetools.com/free-trial and fill out the form to get an email with instructions for creating your trial organization and initial project. The process is quite fast because commercetools automates all the work behind the scenes to provision cloud resources for you. Note the key you used for your project as it will be used in Step 2. Once you have your first project in place, proceed to the next step.
Step 2: Load sample data.
If you already have a commercetools project loaded with sample data, you can skip this step. If not, commercetools provides an open source project to make this easy. If you’re comfortable running open source tools, you may prefer to just follow the steps in the Sunrise Data README; if not, here is what you should do:
Open a command line (our examples use bash) and issue these three commands to clone and initialize the commercetools-sunrise-data open source repository:
$ git clone https://github.com/commercetools/commercetools-sunrise-data.git
$ cd commercetools-sunrise-data/
$ npm install
The commercetools-sunrise-data application needs some configuration so it knows what project to load the data into and has the credentials it needs to perform its work. Here are the steps:
- Login to the Merchant Center and then navigate to Settings -> Developer Settings from the left navigation.
- Click “Create new API Client”
- For field Name, enter:
admin-client - For field Scopes, select:
Admin client - Click “Create API Client”
- Note all the information provided by the Merchant Center as we will use them in the next step.
Now that we have the configuration details we need, we can create a .env file for the commercetools-sunrise-data application to leverage. Create a new file called
.envat the root of your commercetools-sunrise-data directory. It should have the following entries; replace the generic values with information you captured in the previous step. If you lost your configuration details, you can perform the previous step again and create a new API Client without harm:CTP_PROJECT_KEY = <your project key> CTP_CLIENT_ID = <your client ID> CTP_CLIENT_SECRET = <your client secret> CTP_API_URL = <your apiUrl> (i.e., api.commercetools.com) CTP_AUTH_URL = <your authUrl> (i.e., auth.commercetools.com)You are now ready to load data. Assuming all the previous steps were successfully followed, a single command will load data for you. Note that this command will _replace all data in the project! _If you need to retain existing data, see further instructions in the README.md.
$ npm run start
Step 3: Create a new Type to define the Custom Field.
Before you can use a custom field on a resource, first you will need to define a new Type. This Type will extend the data model on that resource, in this case line-item, by defining the list of fields we hope to add. Each resource you create in commercetools can use the default values or specify one Type with the fields desired.
We will use a simple data model, described using JSON, and we will provide localization support in English and German to show you how that can be leveraged when we look at front end changes later:
{
  "key": "line-item-addedFrom",
  "name": {
    "en": "Add to cart source",
    "de": "In den Warenkorb legen"
  },
  "resourceTypeIds": ["line-item"],
  "fieldDefinitions": [
    {
      "type":{
        "name":"LocalizedString"
      },
      "name":"addedFrom",
      "label":{
        "en":"Added From",
        "de":"Hinzugefügt von"
      },
      "required":false,
      "inputHint":"SingleLine"
    }
  ]
}
There are four things to highlight from this definition:
- We will use the
keyfield to set theline-itemType through our REST and GraphQL calls. We can also use thekeyfield in queries for this Custom Field later. - We use the
resourceTypeIdsfield to identify the commercetools resource(s) we are extending. In our use case, we want to extend the LineItem resource which has a resourceTypeId ofline-item. You can find a mapping of Resource to Resource type id here. Note thatresourceTypeIdsis an array so we can easily use this Type in other resources by specifying more than one here. - We use the
fieldDefinitionsarray to model the Custom Field data. In this simple case, we have a single LocalizedString calledaddedFrom. - We set
requiredto false in the fieldDefinition so that LineItems can be created without our Custom Field being set. This is important in our use case because we may not cover all places where lineItems are created in our initial implementation. We don’t want to break existing code!
Now that we have a TypeDraft, we can create it using IMPEX or by directly using the HTTP API.
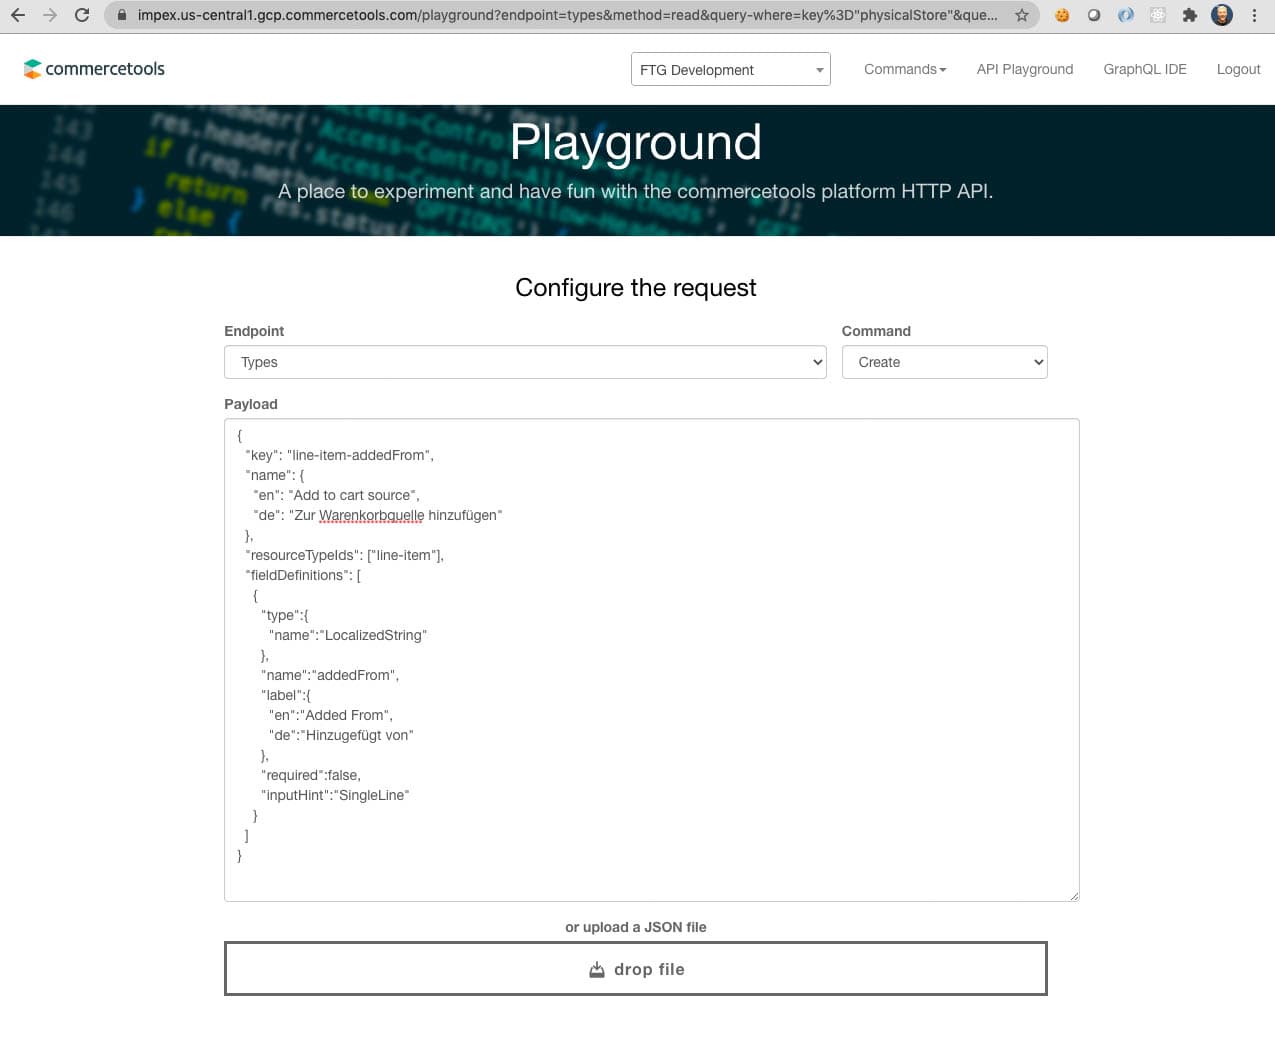
To leverage IMPEX, go to the Login page and click the appropriate API Playground link for your region. From the IMPEX home page, click on the API Playground link in the header and login.
There is a drop down control in the header to allow you to select a project. Make sure you have the right one selected. In the Endpoint field, select Types. In the Command field, select Create. In the Payload field, paste our JSON. The form should look roughly like the following screenshot. Click GO to execute the request.
To directly use the HTTP API, we can take advantage of tools like Postman or curl. If you are familiar with Postman, commercetools provides a repository containing Postman collections for the platform. We will show examples using curl. Feel free to skip to Step 4 if you want to stick with the IMPEX API Playground.
We can use curl in two steps. First, we need an authorization token. Run the following from the command line, substituting AUTH_HOST, CLIENT_ID, SECRET and PROJECT_KEY with data we noted in Step 2.
curl https://AUTH_HOST/oauth/token \
--basic --user "CLIENT_ID:SECRET" \
-X POST \
-d "grant_type=client_credentials&scope=manage_project:PROJECT_KEY"
Second, we use the returned access_token to provide authorization when performing a POST to the types endpoint. Run the following from the command line, substituting ACCESS_TOKEN with the access_token returned in the previous step and API_HOST and PROJECT_KEY with data we noted in Step 2:
curl -sH "Authorization: Bearer ACCESS_TOKEN" \
-H 'content-type: application/json' \
-d '{"key": "line-item-addedFrom", "name": {"en": "Add to cart source", "de": "In den Warenkorb legen"}, "resourceTypeIds": ["line-item"], "fieldDefinitions": [{"type": {"name": "LocalizedString"}, "name": "addedFrom", "label": {"en": "Added From", "de": "Hinzugefügt von"}, "required": false, "inputHint": "SingleLine"}]}' \
https://API_HOST/PROJECT_KEY/types
In either scenario, commercetools will respond with the Type created. The response should look similar to:
{
  "id": "253a22b0-eb54-4b02-b919-7940050bdaad",
  "version": 1,
  "createdAt": "2020-09-16T16:38:47.754Z",
  "lastModifiedAt": "2020-09-16T16:38:47.754Z",
  "lastModifiedBy": {
    "clientId": CLIENT_ID,
    "isPlatformClient": false
  },
  "createdBy": {
    "clientId": CLIENT_ID,
    "isPlatformClient": false
  },
  "key": "line-item-addedFrom",
  "name": {
    "en": "Add to cart source",
    "de": "In den Warenkorb legen"
  },
  "resourceTypeIds": [
    "line-item"
  ],
  "fieldDefinitions": [
    {
      "name": "addedFrom",
      "label": {
        "en": "Added From",
        "de": "Hinzugefügt von"
      },
      "required": false,
      "type": {
        "name": "LocalizedString"
      },
      "inputHint": "SingleLine"
    }
  ]
}
You can query for the Type by key as well. Using IMPEX, set Endpoint to “Types”, Command to “Query” and Where to key="line-item-addedFrom" and click GO. Here is the corresponding curl command:
curl -sH "Authorization: Bearer ACCESS_TOKEN" https://API_HOST/PROJECT_KEY/types/key="line-item-addedFrom"
Step 4: Create a Cart.
Now that we have an access token, we can easily create a cart by sending a POST to the cart resource, sending two fields in the JSON body: currency and country.
curl -sH "Authorization: Bearer ACCESS_TOKEN" \
-H 'content-type: application/json' \
-d '{"currency": "USD", "country": "US"}' \
https://API_HOST/PROJECT_KEY/carts
The key thing we need from the response is the id field, which uniquely identifies this cart, so keep that handy. Note that the lineItems field is an empty array; we will rectify that in the next step!
It’s important to note that even though country is not required in the CartDraft specification, subsequent cart updates may fail with errors if it’s not specified. The error stems from the sunrise data set we imported. It has the “EU” as default and USD pricing is only set for country “US”. So, if you create a cart with no country specified and USD, it can't find a matching price. By setting USD and US it can find the price. Another option is to modify the product data, then country would not be required at the cart level. If we get it wrong, here is a snippet from an error that may result:
{
  "statusCode": 400,
  "message": "The variant '1' of product '0d34b0cc-6dc0-4df7-943c-321500dc492c' does not contain a price for currency 'USD' all countries, all customer groups and all channels.",
  "errors": [{
    "code": "MatchingPriceNotFound",
    [...]
  }],
  [...]
}
Step 5: Update the Cart to add a LineItem using our Custom Field.
Now that we have a cart, we can start adding line items. We can add a line item by specifying a SKU from our sample data set; this example uses “M0E20000000DZWJ” but any will do. Here is a LineItemDraft where we specify in our Custom Field that it was added from from the PDP (product detail page) and we supply the localized values. Again, our fake use case does not demand a LocalizedString but you can see how the platform supports them:
{
  "version": 1,
  "actions": [
    {
      "action": "addLineItem",
      "sku": "M0E20000000DZWJ",
      "quantity": 1,
      "custom": {
        "type": {
          "key": "line-item-addedFrom",
          "typeId": "type"
        },
        "fields": {
          "addedFrom": {
            "en": "PDP",
            "de": "Produkt-Detailseite"
          }
        }
      }
    }
  ]
}
Note that the custom field in the above payload aligns with the TypeDraft we specified in Step 3.
To persist this line item, we POST to the cart endpoint, specifying the cart we are updating in the endpoint’s URL. Substitute CART_ID with the id noted in Step 4. Note that the version must be set correctly as well; if you’ve made interim cart edits, the version may no longer be 1.
curl -sH "Authorization: Bearer ACCESS_TOKEN" \
-H 'content-type: application/json' \
-d '{"version": 1, "actions": [{"action": "addLineItem", "sku": "M0E20000000DZWJ", "quantity": 1, "custom": {"type": {"key": "line-item-addedFrom", "typeId": "type"}, "fields": {"addedFrom": {"en":"PDP", "de":"Produkt-Detailseite"}}}}]}' \
https://API_HOST/PROJECT_KEY/carts/CART_ID
Cart responses are large so here is a small snippet showing our new line item with our Custom Field:
{
  "type": "Cart",
  "id": "CART_ID",
  [...]
  "lineItems": [
    {
      "id": "f11e1faf-4172-4a03-a30c-fee558106903",
      "productId": "0d34b0cc-6dc0-4df7-943c-321500dc492c",
      "name": {
        "de": "Sneakers Leather Crown weiß",
        "en": "Sneakers Leather Crown white"
      },
      [...]
      "custom": {
        "type": {
          "typeId": "type",
          "id": "253a22b0-eb54-4b02-b919-7940050bdaad"
        },
        "fields": {
          "addedFrom": {
            "en": "PDP",
            "de":"Produkt-Detailseite"
          }
        }
      },
      "lineItemMode": "Standard"
    }
  ],
  [...]
}
Step 6: Test our changes by querying to find all line items added from the PDP.
We can write queries that use our Custom Fields by leveraging Query Predicates. For our use case, we can find all carts containing line items where the field addedFrom is “PDP” by using this query predicate:
lineItems(custom(fields(addedFrom(en="PDP"))))
This predicate can directly be leveraged in IMPEX by setting Endpoint to “Carts”, Command to “Query” and Where to the predicate. Try it out!
Of course, we can also query via the HTTP API as well. Here is the command and note that the query predicate must be URL encoded.
curl -sH "Authorization: Bearer ACCESS_TOKEN" https://API_HOST/PROJECT_KEY/carts?where=lineItems%28custom%28fields%28addedFrom%28en%3D%22PDP%22%29%29%29%29
It’s important to note that on a high volume ecommerce site, it's expensive to run a query like this. The commercetools platform does a great job of adding indexes dynamically but be aware it may take some time as this snippet from the docs makes clear:
If you add a custom field to your carts and start querying it, the commercetools platform will add an index to the project to improve performance if it meets criteria like query frequency. The automatic index creation needs to collect a significant amount of data to not optimize for outlier scenarios. That's why it can take up to two weeks before a new index is added.
– Query Predicates Performance Considerations, Platform Documentation
Step 7: Install the Sunrise SPA Front End.
This feature we’ve built is not much use unless you can update your front end to take advantage of the new Custom Field. The commercetools platform doesn’t restrict you to an out of the box website so there is a lot of implementation variety and many Marketplace Integration solutions to choose from. For this example, we will leverage the open source Sunrise Single Page Application (SPA) front end. Here are the steps to get a local installation we can experiment with.
We will use Fearless Technology Group’s fork of https://github.com/commercetools/sunrise-spa since it includes branches containing the sample code we will review in subsequent steps. Install the application using these commands:
$ git clone https://github.com/FearlessTechnologyGroup/sunrise-spa.git
$ cd sunrise-spa/
$ npm install
Create an API client we can use to configure the application. We can follow the same steps we used in Step B, number 2 but we will create credentials specifically for our front end application:
- Login to the Merchant Center and then navigate to Settings -> Developer Settings from the left navigation.
- Click “Create new API Client”
- For field Name, enter:
spa-client - For field Scopes, select:
Mobile & single-page application client - Under the View subheading, click “
Products (all)” - Click “Create API Client”
- Note all the information provided as we will use them in the next step.
Configure the SPA application to use your commercetools project. Create a file called
.env.localin the root of sunrise-spa. It should look like the following but with the parameters in all caps substituted with information from the previous step:VUE_APP_CT_PROJECT_KEY=PROJECT_KEY VUE_APP_CT_CLIENT_ID=CLIENT_ID VUE_APP_CT_CLIENT_SECRET=SECRET VUE_APP_CT_SCOPE=manage_my_orders:PROJECT_KEY view_categories:PROJECT_KEY view_products:PROJECT_KEY manage_my_shopping_lists:PROJECT_KEY create_anonymous_token:PROJECT_KEY view_published_products:PROJECT_KEY manage_my_profile:PROJECT_KEY manage_my_payments:PROJECT_KEY VUE_APP_CT_AUTH_HOST=https://AUTH_HOST VUE_APP_CT_API_HOST=https://API_HOSTRun the SPA locally:
$ npm run serve
Open a browser to http://localhost:8080/ to check out the site.
Step 8: Extend the SPA to update our Custom Field on all add to cart actions.
Let’s make edits to the Sunrise SPA to take advantage of our Custom Field. To pick up all the changes we will make in this step, stop the application you started in Step 7 (likely control + c) and check out branch custom-fields:
$ git checkout custom-fields
$ npm run serve
There are three places in the SPA where the user can add to cart:
- Product Thumbnail - hover over a product on a list page and click on the cart icon.
- Product Quick View - hover over a product on a list page, click the quick shop icon, and then click the add to cart button.
- Product Detail Page (PDP) - on any PDP, click the add to bag button.
The custom-fields branch contains edits to the code for all three of these touch points, see ProductThumbnail.js edits, ProductQuickView.js edits and AddToCartForm.js edits. Each edit adds the following highlighted lines and adjusts the value field to be Thumbnail, QuickView, or PDP depending on the location.
return this.updateMyCart({
  addLineItem: {
    sku,
    quantity: 1,
    custom: {
      type: {
        key: 'line-item-addedFrom',
        typeId: 'type',
      },
      fields: {
        name: 'addedFrom',
        value: `{\"en\": \"Thumbnail\", \"de\": \"Vorschaubild\"}`,
      },
    },
  },
})
The SPA uses GraphQL to interface with commercetools so the syntax used here is a bit different than the sample payload we sent using the HTTP API in Step 5. The primary difference is in the fields field where we use a name/value pair with the value formatted using escaped JSON based on the Custom Field’s definition. If you want to drill down on the GraphQL Schema driving this formatting, see lines 6749 to 6787 of sunrise-spa/graphql.schema.json.
It might be nice to also make the data from our Custom Field visible in the UI, just to test it out. We can make two small changes to make that happen.
First, we need to update Cart.gql because it specifies which fields are returned from commercetools when we access the cart endpoint. We need to include customFieldsRaw, see lines Cart.gql#L6-L9.
fragment CartFields on Cart {
  id
  version
  lineItems {
    id
    customFieldsRaw {
      name
      value
    }
[...]
For a bit more information on this configuration, read the GraphQL API's raw custom fields documentation.
Second, we can compute a value to display “Added from...” text, selecting the right LocalizedString based on locale, see this edit in LineItemInfo.js.
addedFrom() {
  if (this.lineItem.customFieldsRaw) {
    const addedFromLocalized = this
      .lineItem
      .customFieldsRaw[0]
      .value[locale(this)];
    return `Added from ${addedFromLocalized}`;
  }
  return null;
},
Finally, we can add an HTML element to LineItemInfo.vue to show our Custom Field.
<span data-test="cart-line-item-sku">
  {{ addedFrom }}
</span>
Navigate to a URL like http://localhost:8080/US/en/products/women and add a few products to cart using each of the three touch points. Then head to http://localhost:8080/US/en/cart to see the source for each line item. The “Added from…” message should appear in the Description column and look something like this:
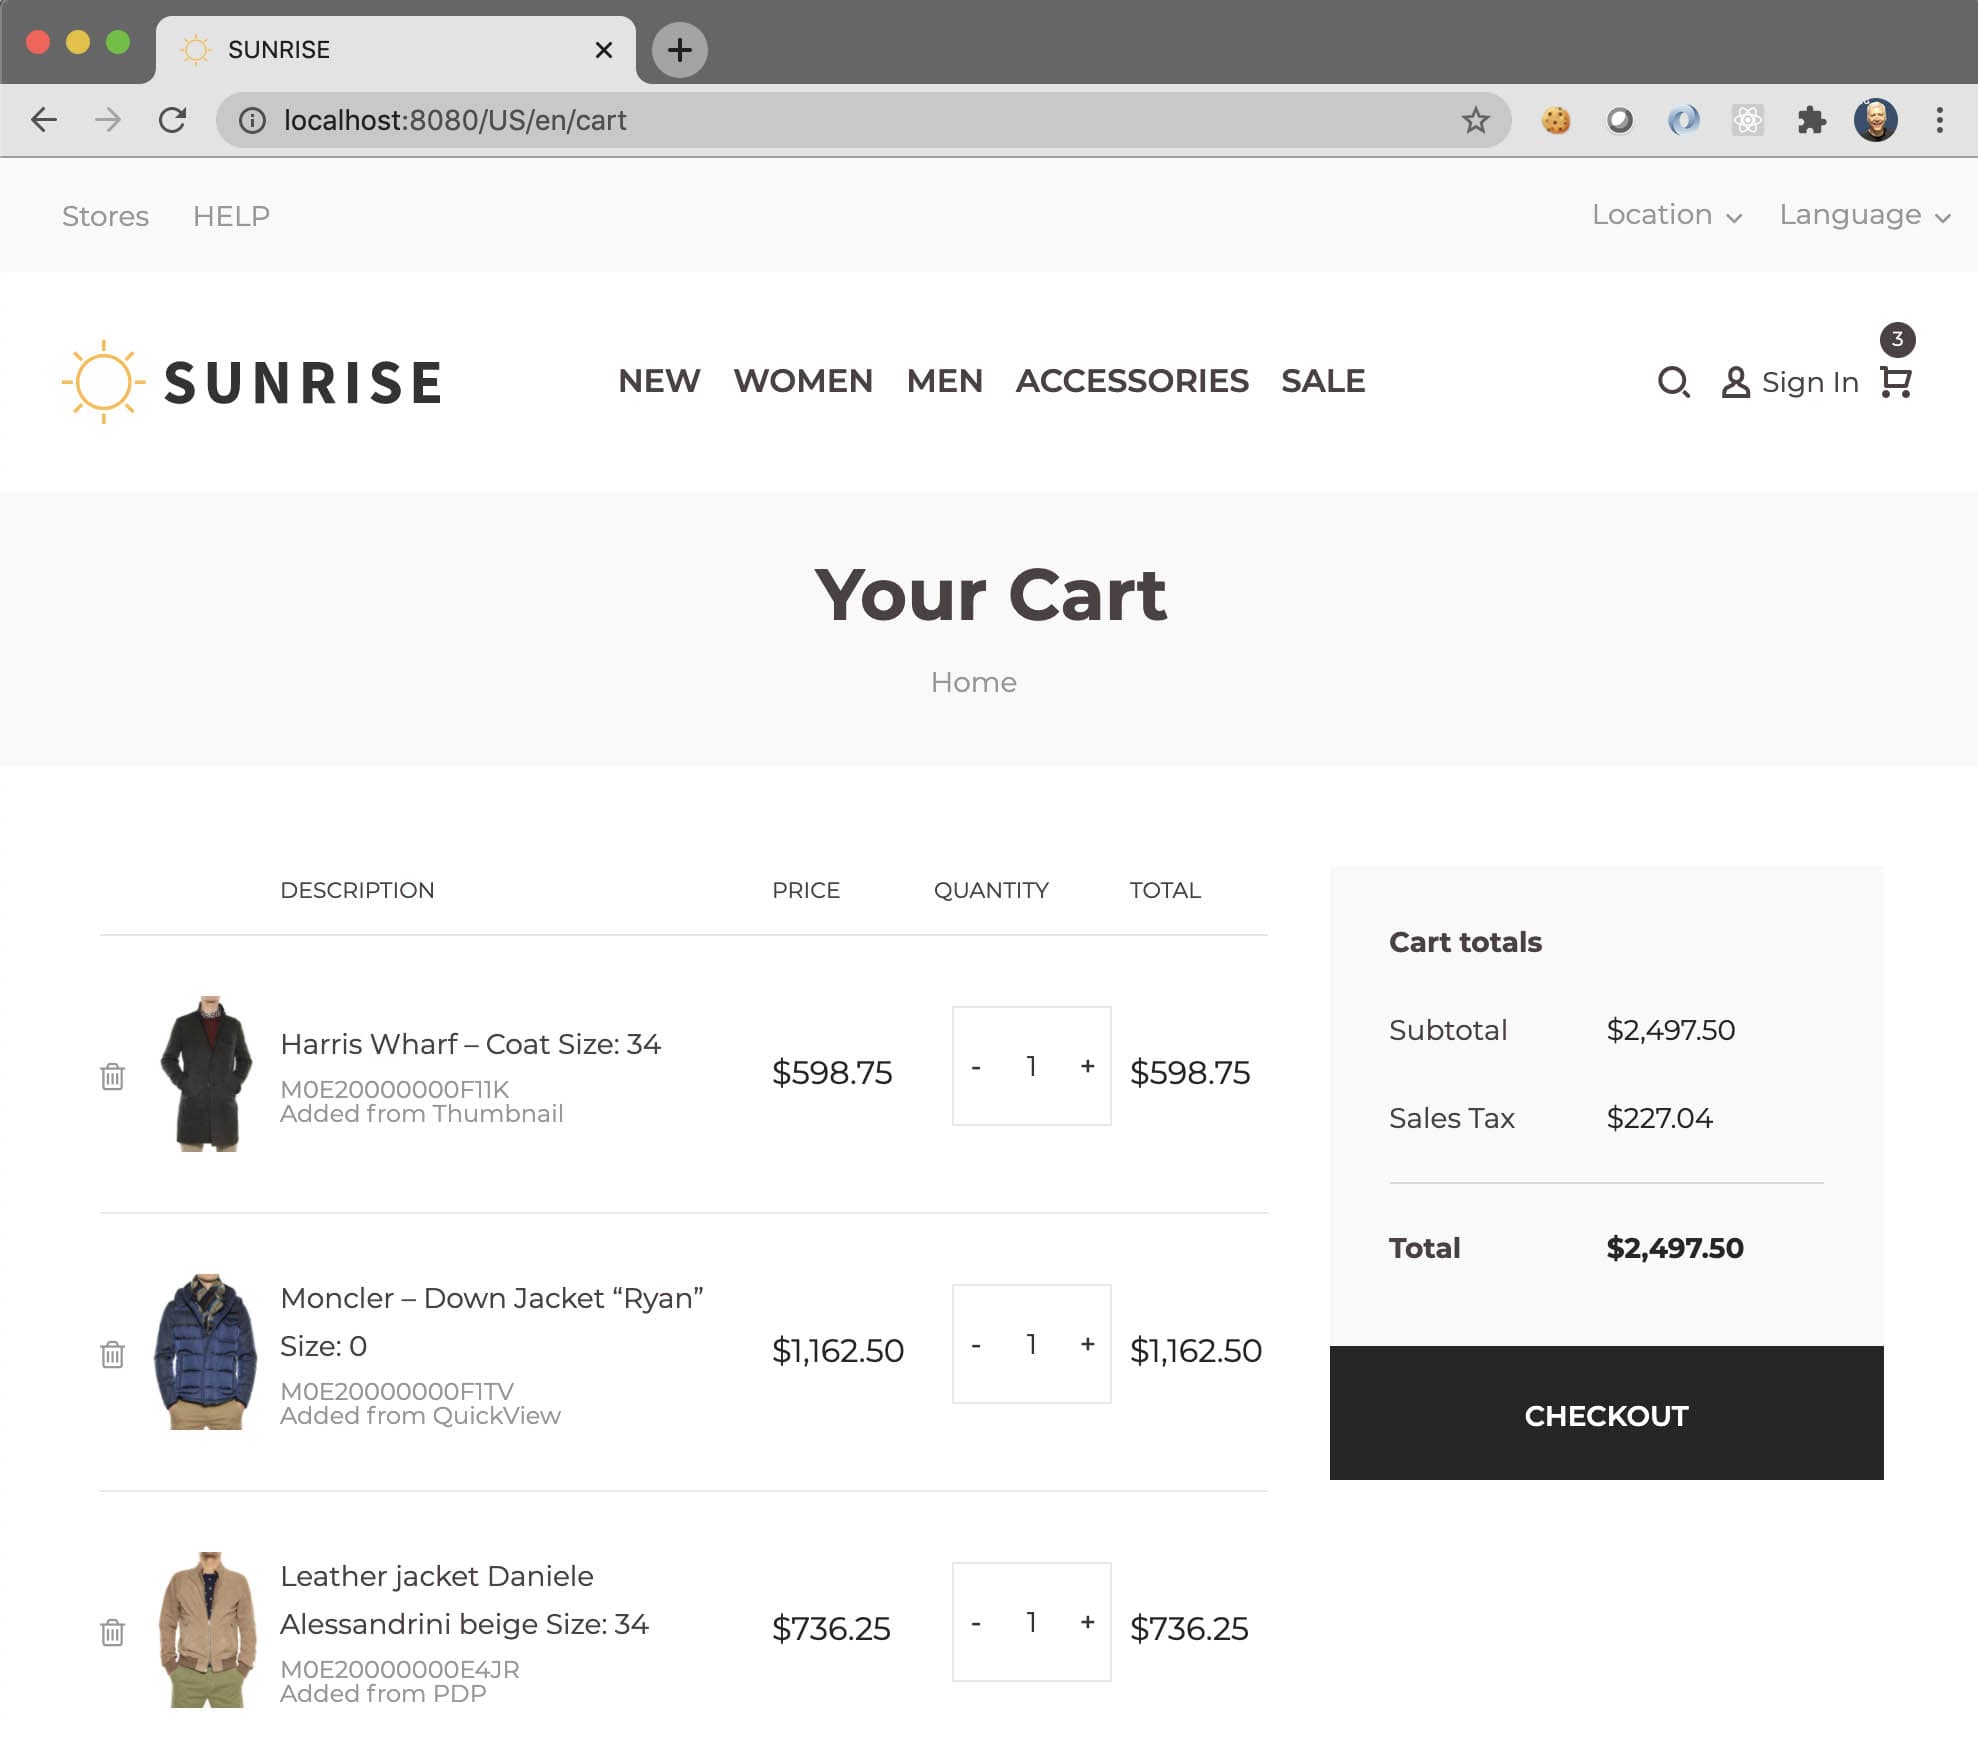
Change the Language from the drop down in the upper right corner to see the LocalizedString changes.
Step 9: Test: Query to find all line items added from QuickView.
For this step, it might help to create a few more carts and, on some, only add from one of the three touchpoints.
To start a new cart, you need to clear your browser’s local storage because the SPA’s session data is stored there. To do this using Chrome, open the Developer Tools, go to the Application tab, select Clear Storage from the left pane, click the “Clear Site Data” button and then refresh your page. You should see zero items in your cart after taking these steps so you can start adding to cart again with a fresh basket.
Now that we have a few carts created we can do searches to simulate how a data analytics platform could pull this data into its views. Let’s use IMPEX’s API Playground to quickly do some searches.
First, query for all carts by setting Endpoint to “Carts” and Command to “Query”. Click “Go!!!” and the beginning of the response should give you a total number of carts found.
Next, search for carts that only have lineItems created from the Thumbnail touch point. Change the Where field to “lineItems(custom(fields(addedFrom(en="Thumbnail"))))”, click “Go!!!” and note the updated total number of carts found.
Update the Where field again substituting “Thumbnail” with “PDP” or “QuickView” to see those totals and the cart details returned. If everything went according to plan, you should get different but relevant results for each.
Step 10: Provide you with resources if you need help.
We travelled quite a bit of ground covering Custom Fields and we hope it shows you the power they provide. If you have questions or need additional help, Fearless Technology Group (FTG) is available to assist you. Shoot us an email at contactus@fearlesstg.com so we can lend a hand.
Next Steps
If you’d like to learn more about commercetools, check out the commercetools Documentation. It’s a great resource for learning about the platform and it’s full of tutorials and examples.